Note
Go to the end to download the full example code.
NeuralkAI Classifier Workflow Example#
This example demonstrates how to use the NeuralkAI SDK to:
Create a new project.
Upload a synthetic classification dataset (two moons).
Launch and monitor a classifier training analysis.
Download training results.
Launch and monitor a classifier prediction analysis.
Download prediction results.
We use scikit-learn’s make_moons dataset to simulate a binary classification task.
Step 1 - Import required libraries#
import os
import polars as pl
import tempfile
from pathlib import Path
import matplotlib.pyplot as plt
from sklearn.metrics import accuracy_score
import numpy as np

from neuralk import Neuralk
from neuralk.datasets import two_moons
Step 2 - Load credentials and connect to the NeuralkAI platform#
Instead of hardcoding your credentials, you should store them securely in environment variables.
The most common approaches are:
Environment variables in the operating system
On Linux/macOS with Bash:
export NEURALK_USER=your_username
export NEURALK_PASSWORD=your_password
On Windows (Command Prompt):
set NEURALK_USER=your_username
set NEURALK_PASSWORD=your_password
Using a ‘.env’ file (useful during development)
Create a file named
.envin the root of your project with:NEURALK_USER=your_username NEURALK_PASSWORD=your_password
Then use
python-dotenvto load these variables into your environment.Don’t forget to add
.envto your.gitignoreto avoid committing it.
We try to load the .env file automatically, but if it’s not available, the code still works
as long as the variables are set in the system environment.
try:
    # Try to load .env file if python-dotenv is available
    from dotenv import load_dotenv

    load_dotenv()
except ImportError:
    print("python-dotenv not installed, skipping .env loading")

user = os.environ.get("NEURALK_USER")
password = os.environ.get("NEURALK_PASSWORD")

assert (
    user is not None and password is not None
), "Missing NEURALK_USER or NEURALK_PASSWORD. Set them in your environment or a .env file."

client = Neuralk(user, password)
Step 4 - Create a new project and upload precomputed moons dataset#
for project in client.projects.get_list():
    if project.name == "MoonsExample":
        client.projects.delete(project)

project = client.projects.create("MoonsExample")
print("Project created:", project)

moons_data = two_moons()
print(moons_data["path"])

dataset = client.datasets.create(
    project,
    "MoonsExample",
    moons_data["path"],
    )
print("Dataset uploaded:", dataset)
Project created: Project(name='MoonsExample', id='6236e37f-c705-4879-9531-649f9356719b', dataset_list=[], user_list=[('OWNER', User(id='5e00262a-34d4-416a-80d4-296ae1b87585', email='alexandre.abraham@neuralk-ai.com', firstname='Alexandre', lastname='Abraham'))], project_file_list=[], analysis_list=[])
/Users/aabraham/neuralk/src/neuralk/datasets/data/moons.csv
Dataset uploaded: Dataset(id='f1d64b97-2179-4d94-8afa-0008b5b77ac2', name='MoonsExample', file_name='moons.csv', analysis_list=[])
Step 5 - Create a classifier training analysis#
We specify the column to predict (“label”) and the features to use.
analysis_fit = client.analysis.create_classifier_fit(
    dataset,
    "Two Moons Classifier",
    target_column="label",
    feature_column_name_list=["feature1", "feature2"],
)
print("Classifier training analysis created:", analysis_fit)
Classifier training analysis created: Analysis(id='129d5265-5092-4c55-aa31-90ee989e3978', name='Two Moons Classifier', error=None, advancement=None, status='PENDING')
Step 6 - Wait for training to complete#
We monitor the training progress until it’s complete.
analysis_fit = client.analysis.wait_until_complete(analysis_fit, verbose=True)
Analysis status: None

Analysis status: PENDING

Analysis status: RUNNING

Analysis status: SUCCEEDED ✅
Step 7 - Launch a prediction analysis#
We reuse the same dataset and model to perform predictions.
analysis_predict = client.analysis.create_classifier_predict(
    dataset, "Two Moons Prediction", analysis_fit
)
print("Prediction analysis launched:", analysis_predict)
analysis_predict = client.analysis.wait_until_complete(analysis_predict,
                                                       verbose=True)
Prediction analysis launched: Analysis(id='3d76f7c6-dc9d-4b59-89bf-4db60ae7aa05', name='Two Moons Prediction', error=None, advancement=None, status='PENDING')

Analysis status: None

Analysis status: PENDING

Analysis status: SUCCEEDED ✅
Step 8 - Download prediction results#
with tempfile.TemporaryDirectory() as results_dir:
client.analysis.download_results(analysis_predict, folder_path=results_dir)
print("Prediction results downloaded to temporary directory")
results_file = next(Path(results_dir).iterdir())
y_pred = pl.read_parquet(results_file)["label"].to_numpy()[:, 0]
X = pl.read_csv(moons_data["path"])
y = X["label"].to_numpy()
X = X.drop("label").to_numpy()
acc = accuracy_score(y, y_pred)
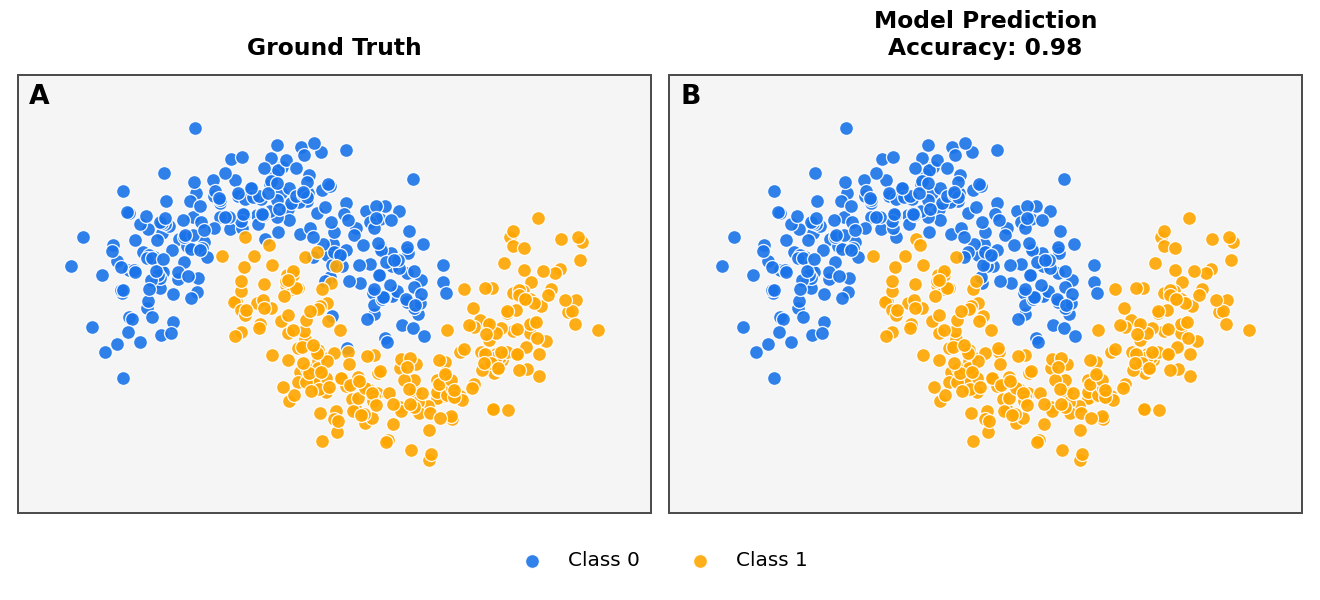
print(f"Accuracy of classification: {acc}")
Prediction results downloaded to temporary directory
Accuracy of classification: 0.984
Step 9 - Plot the results#
plt.rcParams.update(
    {
        "axes.edgecolor": "#4d4d4d",
        "axes.linewidth": 1.2,
        "axes.facecolor": "#f5f5f5",
        "figure.facecolor": "white",
    }
)

fig, axes = plt.subplots(1, 2, figsize=(11, 5), dpi=120)
titles = ["Ground Truth", f"Model Prediction\nAccuracy: {acc:.2f}"]
colors = ["#1a73e8", "#ffa600"]  # Professional blue & orange

for idx, ax in enumerate(axes):
    labels = y if idx == 0 else y_pred
    for lab in np.unique(labels):
        ax.scatter(
            X[labels == lab, 0],
            X[labels == lab, 1],
            s=70,
            marker="o",
            c=colors[lab],
            edgecolors="white",
            linewidths=0.8,
            alpha=0.9,
            label=f"Class {lab}" if idx == 0 else None,  # Legend only on first panel
            zorder=3,
        )

    # Aesthetics
    ax.set_xticks([])
    ax.set_yticks([])
    ax.set_aspect("equal")
    ax.set_title(titles[idx], fontsize=14, weight="bold", pad=12)
    ax.grid(False)

    # Subtle outer border (inside the axes limits)
    x_margin = 0.4
    y_margin = 0.4
    ax.set_xlim(X[:, 0].min() - x_margin, X[:, 0].max() + x_margin)
    ax.set_ylim(X[:, 1].min() - y_margin, X[:, 1].max() + y_margin)

    # Panel annotation (A, B)
    ax.text(
        0.05,
        0.98,
        chr(ord("A") + idx),
        transform=ax.transAxes,
        fontsize=16,
        fontweight="bold",
        va="top",
        ha="right",
    )

# Shared legend beneath the plots
handles, labels_ = axes[0].get_legend_handles_labels()
fig.legend(
    handles,
    labels_,
    loc="lower center",
    ncol=2,
    frameon=False,
    fontsize=12,
    bbox_to_anchor=(0.5, 0.02),
)

fig.tight_layout()
plt.subplots_adjust(bottom=0.05)
plt.show()
Step 10 - Clean the environement#
client.logout()
<Response [200]>
Total running time of the script: (1 minutes 58.568 seconds)